


ZenCommunity Pro allows you to enable real-time live chat using WebSockets. Follow the steps below to enable
and configure it.
1. Enable Real time Communication in WordPress
- Go to the Settings page in your ZenCommunity admin panel.
- Find Enable Realtime Communication and toggle the switch.
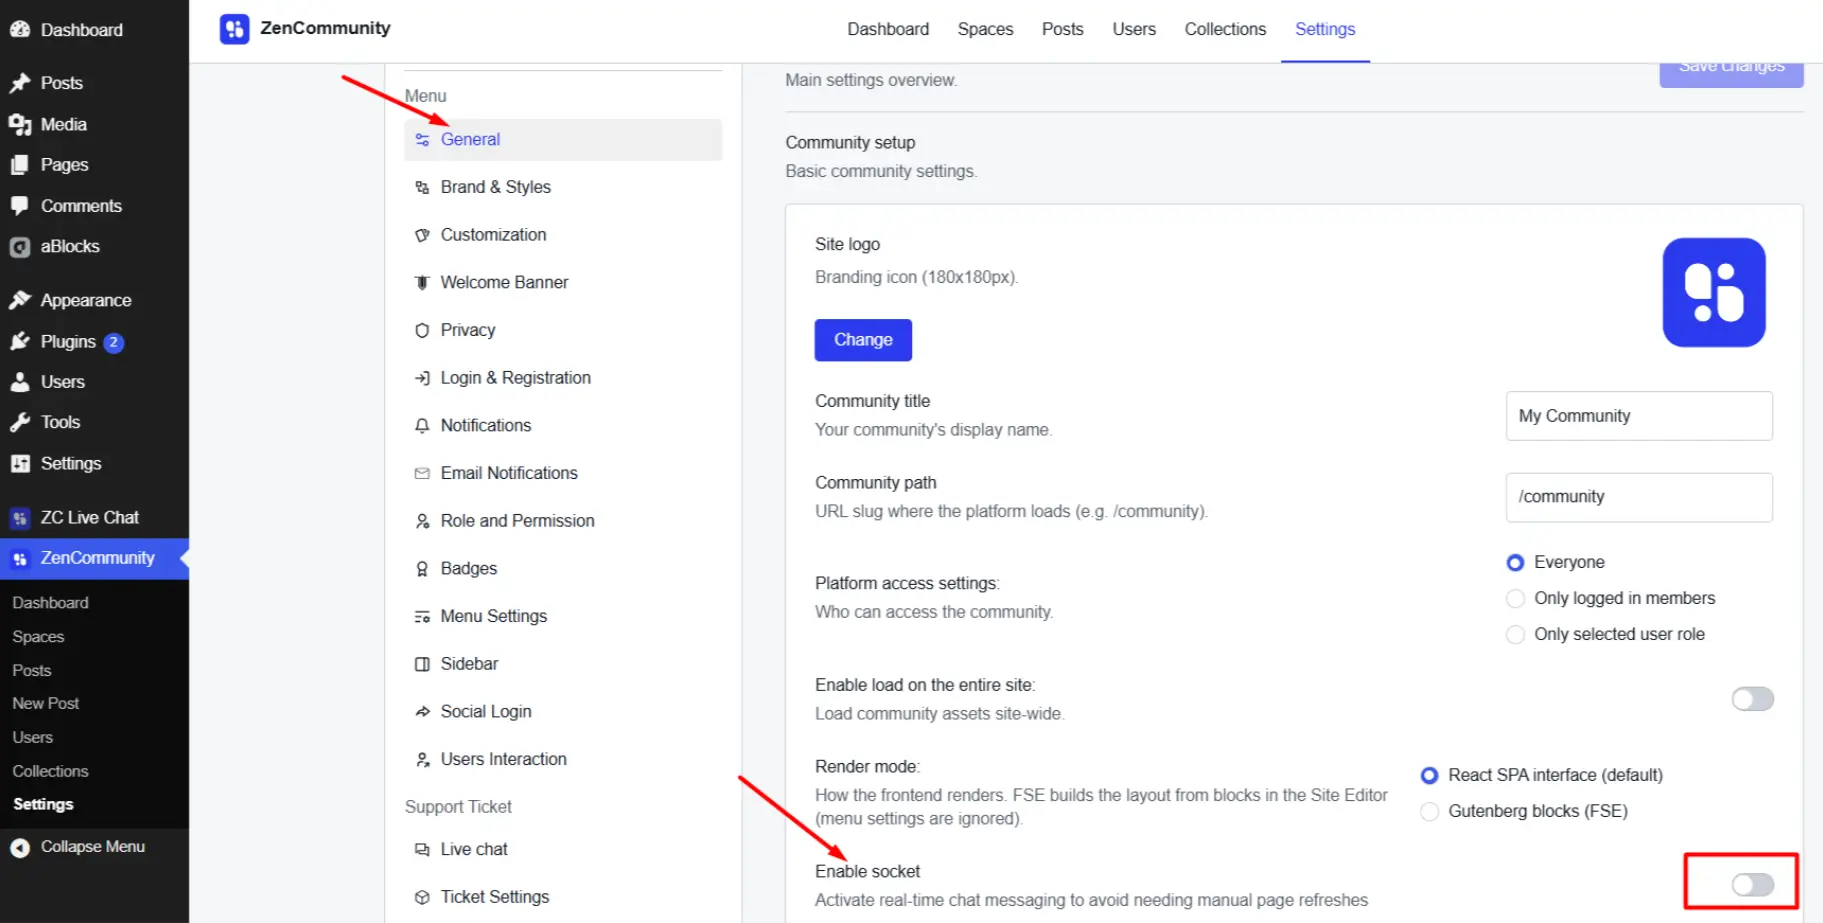
2. Enable the Socket Service on the Server
You need to run the socket server on your server where the community site is hosted.
Step 2.1: SSH into your server
ssh user@your-server-ipThen cd into your WordPress installation directory
cd /var/www/html # adjust path to your installationStep 2.2: Generate a JWT Secret
The socket service uses a JWT token to authenticate users. Generate it using the CLI:
# From WordPress root
wp zc-jwt-secret generate
This command will generate a secret key stored in your WordPress database.
Step 2.3: Start the Socket Server
You can start the socket server using the CLI:
wp zc-socket startAvailable options:
| Option | Default | Description |
| –port | 8080 | Port number the socket listens on |
| –local | false | For local testing environment |
Example
wp zc-socket start --port 8080This command runs the socket server in the current terminal session. Press Ctrl+C (or Cmd+C on Mac) to
stop it.
Step 2.4: Run Socket Server in Background
To keep the server running even after you log out, use nohup:
nohup wp zc-socket start >> zc-socket.log 2>&1 &This will start the server in the background and log output to
zc-socket.logStep 2.5: Install Socket Server as a Background Service
ZenCommunity Pro provides a CLI command to install the socket server as a system service (supports Linux
systemd or init.d). This allows automatic startup on server boot.
wp zc-socket installOptions supported:
- –port — specify a custom port if running multiple instances.
- –local — for local testing.
Example: Running multiple servers on different ports:
wp zc-socket install --port 80813. Configure Web Server for WebSocket Proxy
In production, itʼs recommended to proxy WebSocket traffic through your web server (Nginx or Apache) so it uses
the same SSL certificate and domain.
Nginx
Edit your site config
(common path: /etc/nginx/sites-available/site-name )and add:
location ^~ /ws/ {
proxy_pass http://127.0.0.1:8080/; # trailing slash matters

proxy_http_version 1.1;
proxy_set_header Upgrade $http_upgrade;
proxy_set_header Connection "Upgrade";

proxy_set_header Host $host;
proxy_set_header X-Real-IP $remote_addr;
proxy_set_header X-Forwarded-For $proxy_add_x_forwarded_for;
proxy_set_header X-Forwarded-Proto $scheme;
}
Test and reload Nginx:
nginx -t
nginx -s reload
Apache (Optional) (experimental config)
If your server uses Apache with SSL, enable mod_proxy and mod_proxy_wstunnel :
# Enable required modules
a2enmod proxy
a2enmod proxy_http
a2enmod proxy_wstunnel
systemctl restart apache2
Add the following to your site config (assuming site already using ssl):
<VirtualHost *:443>
ServerName yourdomain.com

# Other normal Apache config here...

# WebSocket proxy
ProxyPass "/ws/" "ws://127.0.0.1:8080/"
ProxyPassReverse "/ws/" "ws://127.0.0.1:8080/"

RequestHeader set X-Real-IP %{REMOTE_ADDR}s
RequestHeader set X-Forwarded-For %{REMOTE_ADDR}s
RequestHeader set X-Forwarded-Proto "https"
</VirtualHost>
4. Test Realtime Communication
- Open your community site in a browser.
- Send a message or perform an action that uses live chat.
- Check browser console/network tab or zc-socket.log for WebSocket connection.
If the WebSocket connection is established and messages are delivered in real-time, your setup is succe.
✅ Notes
- Make sure the port used by the socket server is open and not blocked by firewall.
- You can run multiple socket servers on different ports if hosting multiple communities.
- Use background service installation for production to ensure the socket server starts on reboot.